THE BEST WAY TO LAY PAVING – OUR GUIDE TO LAYING STONE AND PORCELAIN

As part of our service to our clients we like to provide as much information as possible about our products and how to install them. Our paving products are high value materials and should be installed by landscape professionals. The information provided within this guide is for guide purposes only. You should always use this information in conjunction with conversation with your contractor who will taylor the build to the specifications of your particular project.
If you are in doubt over any aspect of installation we always advise that you consult an experienced hard-landscaping professional.
Do Our Products Justice
We advise our clients that the success and beauty of their landscaping project rests on two factors; selecting fantastic materials and choosing the right installation contractor. You need to get both aspects right to make a dream landscape. How do we know? We’ve been doing this since 1970, so we’ve seen a build or two. We know the recipe required to create something special- and we like to share our secret sauce with our customers. Where possible we always recommend you use a landscape professional, especially when one of our lovely paving products is involved. If you don’t know any great landscapers, don’t worry – because we do. Chat to one of our sales team about your project and your location and they’ll be able to provide you with a few contacts that will do our products, and more importantly, your property justice. This is how we make dream landscapes possible.
Tailor To The Material
Not all paving is the same and it shouldn’t be treated as such. You’ll need to adjust your approach, technique and possibly building materials to suit the paving you’ve chosen and the look or finish you want to achieve. Reclaimed York Flagstones require much more thought and effort when laying compared to an Indian Sandstone. Jointing compounds that work wonderfully with natural stone will not be suitable for porcelain paving options. You also need to be aware of the composition of the paving product as this might affect the cleaning and sealing products you use on it during and after the build project.
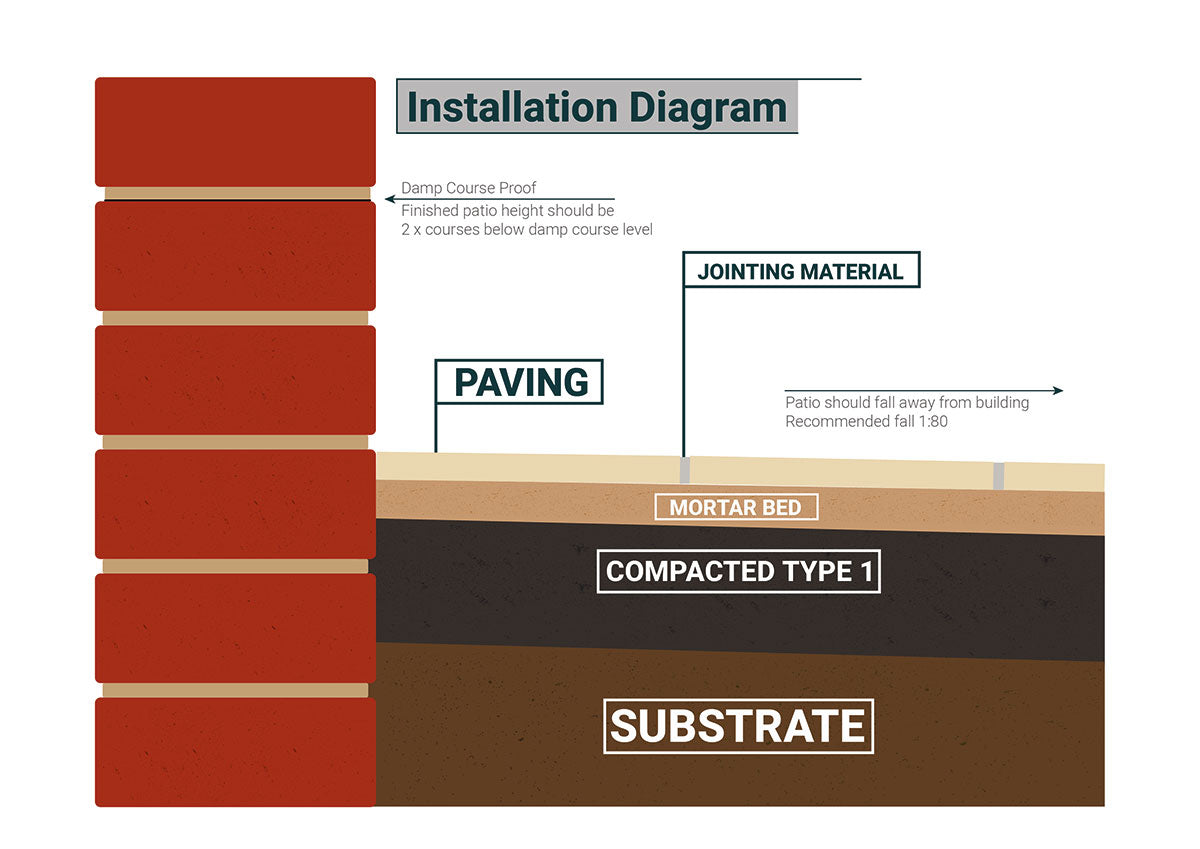
Always lay paving on a properly prepared sub- base and consider where your patio will drain from the outset. Ideally your patio should drain away from the building via a fall of 1:80. This means for every 80 units of distance away from the building your property travels it should drop by 1 unit. If this is not possible suitable drainage slots and groundworks should be installed. Your paving should be laid two brick courses below the damp poof course of the property. You should always lay paving on a full mortar bed and not ‘dot and dab’ – this will give the paving stones full support and ensure moisture is drawn through them evenly. Depending on your paving choice you may need to use additional adhesive compounds to help the slabs adhere to the bed. Always use jointing material appropriate for the paving.
Construction Measurements
Sub-Base Depth (MOT Type 1)
Patio – 100mm
Driveway – 150mm
Mortar Bed
Full Bed – 25mm – 50mm Thick
Patio – 5:1 [Sharp Sand : Cement]
Driveway – 4:1 [Sharp Sand : Cement]
Bond Bridge
Mix SBR Mixture with cement until a bonding paste is created. Usually around 2 parts SBR one part cement.
Pointing Material
5-15mm Joins as recommended in the respective product guide. Use a material appropriate for the product.
Fall/Drainage
1:80
Put Your Paving to Bed
Paving stones and tiles need to be laid on a proper bed. We’re not talking about the king- size you’ve been eyeing up in Ikea. We’re talking a proper full bed of mortar so that your lovely paving will remain where you’ve laid it for years to come. If done right you’ll be sipping a refreshing beverage out on this patio in 10 years time and still admiring it. Make a mortar mix to our material guidelines and spread it out onto your prepared sub-base to at least the advised thickness of 25-30mm. Spread the mortar so that it is covering an area larger than the slab you’re planning to lay. Then use a trowel to create peaks and troughs in the bed – similar to what you see in the above picture. Place the slab on the mortar and using a rubber mallet tap the paver down so that it begins to line up with the levels you set for your patio. Remember your paving needs to be completely level along one plane and gently sloping for the fall of the patio on the other. Use a spirit level when tapping the paver into position to confirm you’ve got it in the right position. It’s also a good idea to set-out string lines to the levels you want in your work area before you start laying your slabs. These can be your guide. Don’t ever be tempted to lay your paving on dots of mortar instead of a full bed. The technique may save you a little time but it gives rise to a whole host of problems that will undermine the job you’re doing. If in doubt contact a professional paving contractor – we can recommend some in your area if you don’t know any.

Natural Stone Characteristics
Colour Variation
All natural stone products vary in colour from slab to slab. Some paving types vary more than others and many vary from batch to batch as the quarries hit varying seems of rock. Be sure to evenly distribute your flagstones to ensure a pleasing spread of colour. If you’ve ordered several packs of stone you should open all of the crates and mix the flagstones together as you lay them. This will give you a lovely even blend as a finished result. You should also note that natural stone flags have a top and bottom. Please take care not to lay them upside down. You may laugh at the idea but it’s happened more times than you might think! The top surface will generally be more aesthetically pleasing and the underside is likely to feature grooves and/or score marks from the calibration process. If in doubt about your paving at any point please get in touch with our sales team for assistance.
Chips & Blemishes
Natural stone is not made in a controlled labratory environment and it’s therefore completely normal for it to have small chips, veins and blemishes within its composition. These imperfections are part and parcel of having a stone patio and part of the character of this paving option. We take as much care as possible when we pick and pack our paving stones however, even though our staff are very experienced, these chips and marks are inevitable. Once the stone is laid the vast majority of these imperfections will not be noticeable. If you have a piece of paving which has considerable damage then do not lay it and contact one of our sales team for further advice.

Using a Bond Bridge
More Adhesion Power
For some paving options a normal mortar bed just isn’t enough. It’s usually pavers that have a particularly low porosity. This low porosity is great for repelling moisture and stains but it does mean the pavers struggle to absorb mortar. You’ll find a bond bridge is recommended with Slate and our Porcelain Tiles but it can be required on other materials – consult your product guide for more information. The bond bridge should be made by mixing SBR with cement until a thick soup-like substance is created. You should then paint this mixture onto the back of the pavers before laying them onto your mortar bed. Be aware that this mixture is extremely effective and very difficult to remove once applied. With this in mind take extra care not to get any on the top surface of your paving material. If you do – wipe it off immediately with a clean wet sponge or cloth. Once in contact with your mortar bed the bonding slurry or bridge will aid adhesion and ensure your paving sticks beautifully and stays there long into the future. Always consult the relevant product guide and a landscape professional if you are in doubt.
Laying Stone In The Random Pattern

When laying your natural stone we strongly recommend that you lay it completely random with no repeating pattern. Having said that, we do understand that it’s nice to have a bit of inspiration to get you going. With this in mind, above you can find an example laying pattern using all four sizes. When buying from us here at Miles Stone you will be provided with a fairmixture of all sizes, therefore you may find that if you keep strictly to a pre-defined layout,you could run short on some sizes. Our paving is best laid totally random with no repeating pattern, any piece can go in any space so you can use whichever size you like. A good guideline is to make sure that your joints do not run straight for more than 2m, and you should ensure that all the junctions of your paving joints are “T” junctions and not “+” junctions. Another golden rule is to make sure that you use all the sizes supplied evenly to avoid running out of one size or having too many of another size left over at the end. It may mean that for example you use 2 of one size to every one of another size, it all depends on the quantities that are delivered. Laying natural stone in this way is all about getting a unique look – no two patios should look the same. We will always supply a range of sizes to achieve this. Don’t panic…! Remember if you’re struggling with your patio we can always recommend excellent tradesman in your area that can complete the work for you. Just get in touch.
Laying In Courses Or Single Sizes

When laying paving in coursed rows or single sizes you should take more care with the width of your joins. When laying in this way the gaps between your paving are no longer governed by the sizing of the adjacent paving stones – they need to be governed by you. Following the guidelines of the product you’re using and the recommended gaps of your jointing material you should consider the use of spacers or an equivalent aid to ensure your paving joins are uniform. When paving is laid in rows uneven jointing gaps stick out like a sore thumb and can ruin the look of your patio or path. Remember if you are in any doubt you should seek the advice of an experienced landscape professional.